
Vor kurzem habe ich die Kittelburg vorgestellt, eine Mischung aus Bausätzen und Eigenbau. Alte Mauern, Häuser, Burgruinen und sogar ganze Burgen kann man im Eigenbau herstellen. Hier beschreibe ich wie man aus Pappe und Modelliermasse eine fiktive Burgruine Frankenstein bauen kann.
(Bild Mauern 01). Weiter unten beschreibe ich den Bau eines Turmes für die Kittelberg (Bild Mauern 16). Mauern01 by Rei Kit, on Flickr
Es ist immer gut eine Zeichnung zu machen oder die Modellteile, sobald man sie zugeschnitten hat, aufzubauen. Tesafilm hilft sie provisorisch zusammenzuhalten (Bild Mauern 02).  Mauern02 by Rei Kit, on Flickr
Bild ‘Mauern 03’ zeigt die Materialien und Werkzeuge, die man braucht. Solide Pappe (nicht Wellpappe) in verschiedenen Stärken, lufthärtende Modelliermasse, wie Jovi oder DAS, Malmesser (Malspachtel oder Palettenmesser), Messingprofile, Roller, Spachtel, Lineal, Drahtbürste, scharfes Bastelmesser, Kleber, Acrylfarben.  Mauern03 by Rei Kit, on Flickr
Die Wände werden aus Pappe zugeschnitten und die Fenster- und Türöffnungen mit einem scharfen Bastelmesser ausgeschnitten (Bild Mauern 04). Falls die Pappe eine glatte Papierbeschichtung hat, ist es ratsame diese abzuziehen. Die Modelliermasse haftet besser auf dem rauen Karton und nicht so gut auf glattem Papier. 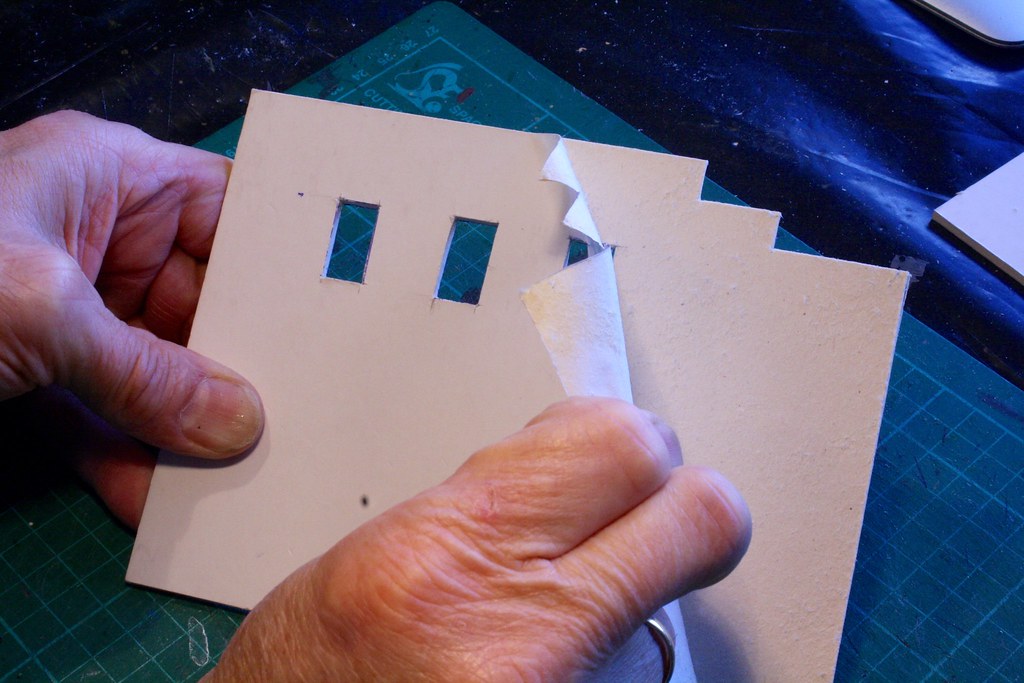 Mauern04 by Rei Kit, on Flickr
Die Modelliermasse wird erst grob (mit Hand und Faust) ausgebreitet und dann mit einem Roller gleichmäßig verteilt (Bild Mauern 05). Dicke ungefähr 2 – 3mm. Als Unterlage dient eine dicke Plastikfolie.  Mauern05 by Rei Kit, on Flickr
Die Kartonwand wird mit Pinsel und Wasser befeuchtet und dann die ausgerollte Modelliermasse daraufgelegt (Bild Mauern 06). Mit dem Roller wird die Masse auf die Pappwand gerollt. Nicht zu fest, aber fest genug um die Konturen der Fenster und Türen zu sehen. 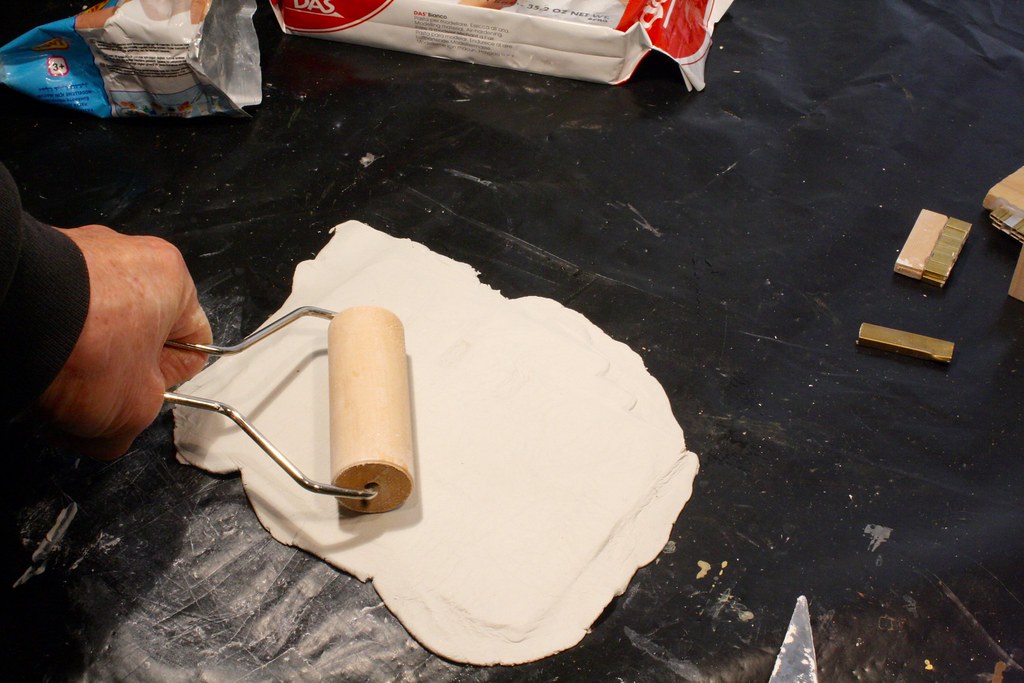 Mauern06 by Rei Kit, on Flickr
Mit dem Malspachtel wird überschüssige Modelliermasse abgeschnitten (Bild Mauern 07).  Mauern07 by Rei Kit, on Flickr
Mit dem Malspachtel schneidet man die Fenster und Türen auf. Das Messingprofil wird benutzt um die Fenster und Türen zu formen (Bild Mauern 08). Mauern08 by Rei Kit, on Flickr
Ein abgeschnittener Pinselstiel hilft die Rundungen zu formen (Bild Mauern 09).  Mauern09 by Rei Kit, on Flickr
Die Fensterrahmen wurden mit dem Malspachtel gebildet (Bild Mauern 10). Ein Messingprofil dient jetzt als Stempel um die Steine der Tür zu formen. Für die Rundung habe ich das Messingprofil mit einer Zange etwas geformt, so dass die Steine die richtige Form für Bögen bekommen.  Mauern10 by Rei Kit, on Flickr
Jetzt kommt die Sisyphusarbeit des Mauerbaus (Bild Mauer 11). Wenn man perfekte Ergebnisse haben will, formt man alle Steine einzeln mit dem Messingprofil. Ich habe mir allerdings einen Stempel gebaut (Messingprofil in viel Stücke zersägt und diese zusammengeklebt). Mit diesem Stempel geht das Einprägen der Mauersteine schneller voran.  Mauern11 by Rei Kit, on Flickr
Mit einer Drahtbürste kann man den Steinen eine raue Oberfläche geben (Bild Mauer 12). Ein paar Steine habe ich mit dem Messingprofil herausgeschnitten. So entstehen Lücken, wie sie es in Wirklichkeit auch gibt. Bitte die Mauer lange (mehrere Tage) trocknen lassen. Hier habe ich die Mauer einzeln gebaut. Oft ist es besser, die Pappwände des Gebäudes schon vorher zusammenzukleben und dann die Modelliermasse aufzubringen. Geschmacksache. 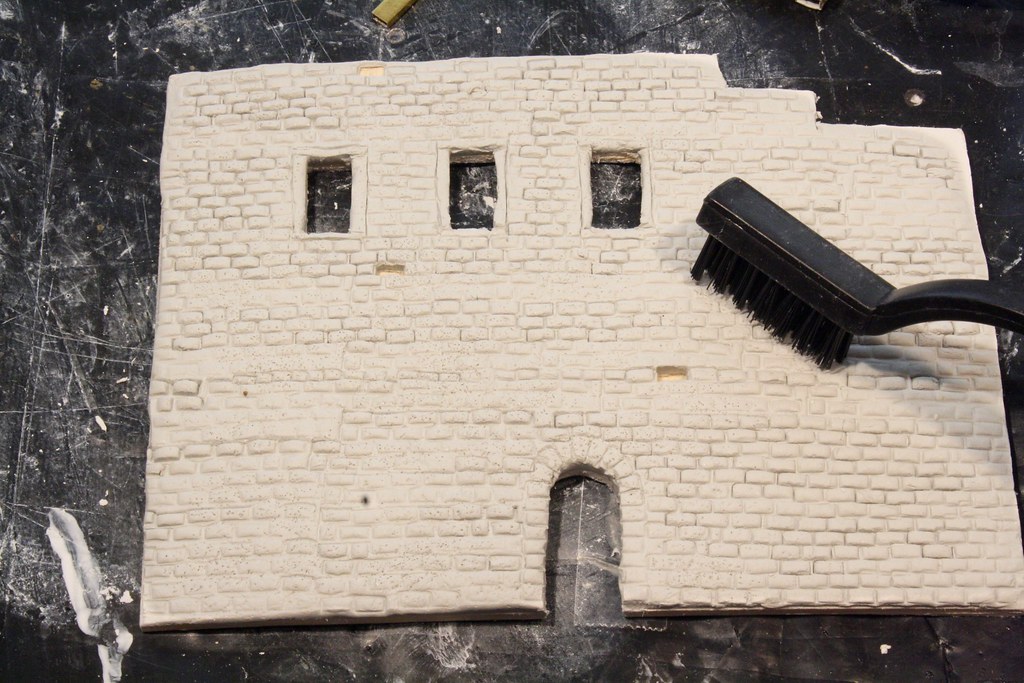 Mauern12 by Rei Kit, on Flickr
Wenn die Mauer trocken ist, die Grundfarbe aufbringen (Bild Mauer 13). Ich verwende leicht verdünnte Acrylfarben. In diesem Beispiel grau aber für die Ruine Frankenstein hatte ich eine gelb-braune Grundfarbe benutzt.  Mauern13 by Rei Kit, on Flickr
Eine braune Lasur oder Wash mit verdünnter Acrylfarbe ist der letzte Schritt für die Mauer (Bild Mauer 14). Naja, danach muss das Gebäude, was immer es wird, natürlich noch zusammengebaut werden.  Mauern14 by Rei Kit, on Flickr
Nahaufnahme der alten Mauern der Burgruine Frankenstein (Bild Mauer 15). Die Halloween Party kann beginnen.  Mauern15 by Rei Kit, on Flickr
WEITER GEHT’S MIT DEM ETWAS SCHWIERIGEREN TEIL DES ALTE MAUERN- UND TURM-BAUS:
Bild ‘Mauern 16’: Hier beschreibe ich das Bauen von Bögen, Zinnen und Ecksteinen. Diese Strukturen geben den Burgen ihre besondere Charakteristik, wie man hier im Foto des Bergfrieds meiner Kittelburg sieht, der vollständig im Eigenbau produziert wurde. 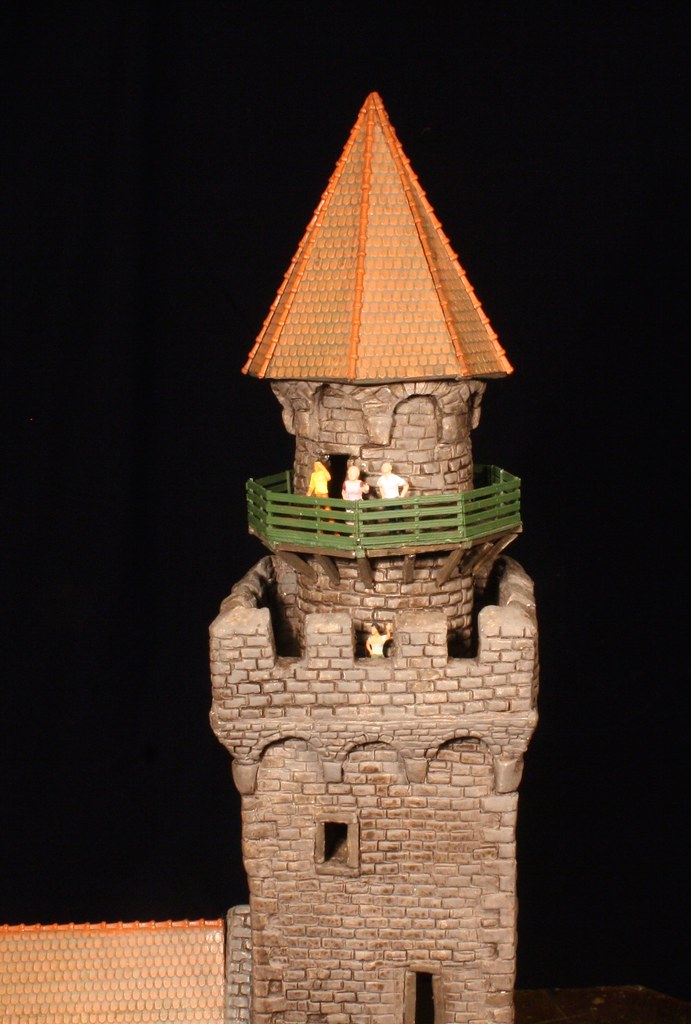 Mauern16 by Rei Kit, on Flickr
Um runde Türme zu basteln, braucht man stabile Pappröhren, wie zum Beispiel hier in Bild ‘Mauern 17’ eine Kartoffelchips Dose.  Mauern17 by Rei Kit, on Flickr
Zuerst wird das glatte Oberflächenpapier entfernt, und dann die Öffnungen für die Tür und die Fenster mit scharfem Bastelmesser ausgeschnitten (Bilder Mauern 18, 19). Es ist wichtig, dass man die Pappröhre stabilisiert, indem man Böden einbaut. Es ist dann möglich die Knetmasse aufzudrücken, ohne die Pappröhre zu verbiegen. Was man in diesem Bild noch sieht ist, dass das Innere der Röhre schwarz angemalt wurde. Da die Fensteröffnungen und die Türöffnungen in einer Burg eben Öffnungen sind, sieht es besser aus wenn es im Innern dunkel ist. Nicht so gut wenn es innen hell aussieht.  Mauern18 by Rei Kit, on Flickr
 Mauern19 by Rei Kit, on Flickr
Um die Zinnen und Bögen zu gestalten, muss man erst mal Rechnen und Aufzeichnen. Dann wird aus dünnerer Pappe der Zinnenkranz mit Bögen ausgeschnitten (Bild Mauern 20).  Mauern20 by Rei Kit, on Flickr
Da man die Bögen dreidimensional haben möchte, klebe ich einen Streifen dicke Pappe an das Ende des Turmes (Bild Mauern 21).  Mauern21 by Rei Kit, on Flickr
Nun wird die dünne Pappe aufgeklebt und mit Pins in Position gehalten bis der Kleber trocken ist (Bild Mauern 22).  Mauern22 by Rei Kit, on Flickr
Zunächst werden die Lücken unter den Bögen mit Modelliermasse gefüllt (Bild Mauern 23). Nur so viel, dass die Lücke geschlossen ist. Im Innern kann es ruhig hohl bleiben.  Mauern23 by Rei Kit, on Flickr
Aus kleinen Stückchen Modellierton werden die unteren, tragenden Steine des Bogens geformt (der Fachausdruck für diese Steine ist wohl „Kämpfer“ oder Impost). Man drückt sie leicht an allen Seiten auf dem Karton fest (Bild Mauern 24).  Mauern24 by Rei Kit, on Flickr
Fenster- und Türrahmen werden aus Tonstreifen geformt, die dicker sind als die Mauerdicke (Bild Mauern 25). Die Keilsteine und der Schlussstein des Bogens werden mit einem Messingprofil geformt, dem mit Hilfe von Zangen die entsprechende Form gegeben wurde. Die anderen Steine werden mit dem normalen Profil geformt.  Mauern25 by Rei Kit, on Flickr
Der obere Teil des Turmes, Zinnen und Bögen, werden mit Modelliermasse gebildet, die fest angedrückt wird (Bild Mauern 26). Nie vergessen den Karton erst anzufeuchten bevor die Knetmasse aufgetragen wird.  Mauern26 by Rei Kit, on Flickr
Die Zinnen werden mit Hilfe des Kunstmessers geformt (Bild Mauern 27), und dann die Bögen ausgeschnitten und mit dem runden Pinselstiel nachgeformt (Bild Mauern 28).  Mauern27 by Rei Kit, on Flickr
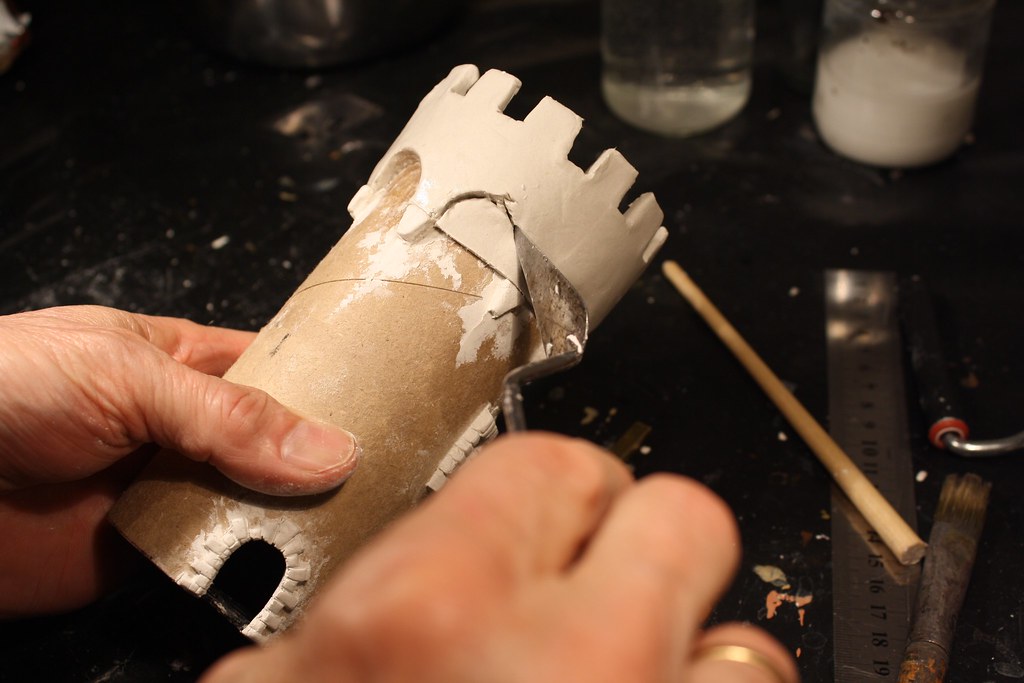 Mauern28 by Rei Kit, on Flickr
Mit dem Messingprofil werden hier die Steine eingeprägt (Bild Mauern 29). 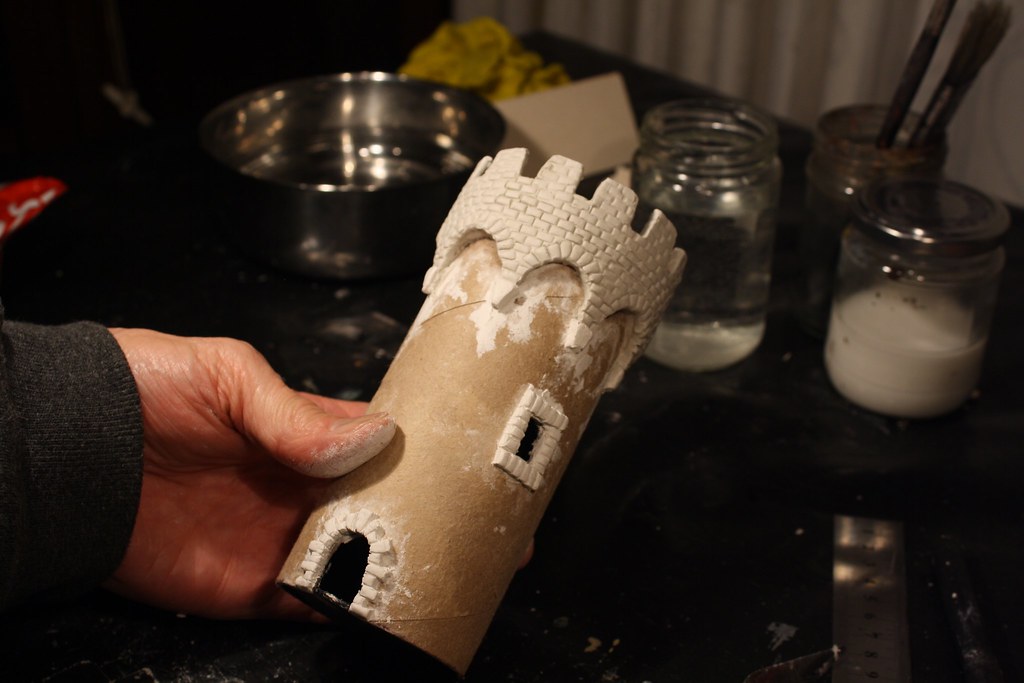 Mauern29 by Rei Kit, on Flickr
Bilder Mauern 30 bis 33: Jetzt wird die eigentliche Turmmauer geformt, und dann wird die Innenseite der Zinnen gebildet. Trocknen lassen und der runde Turm ist fertig um bemalt zu werden.  Mauern30 by Rei Kit, on Flickr
 Mauern31 by Rei Kit, on Flickr
 Mauern32 by Rei Kit, on Flickr
 Mauern33 by Rei Kit, on Flickr
Bilder Mauern 34, 35: Hier zeige ich noch, wie man Ecksteine machen kann. Man bringt einen Streifen der Modelliermasse (dicker als für die Mauer selbst) entlang der Hauskante auf, stanzt die Steine mittels des Messingprofils aus, und lässt sie trocknen.  Mauern34 by Rei Kit, on Flickr
 Mauern35 by Rei Kit, on Flickr
Die Bilder 36 und 37 zeigen den fertig bemalten Rundturm (graue Grundfarbe, braune Lasierung; einige Steine wurden nachgemalt; dann noch mit Pulverfarben gealtert) und den Bergfried mit Burghauptgebäude auf meiner Kittelburg.  Mauern36 by Rei Kit, on Flickr
 Mauern37 by Rei Kit, on Flickr
Falls es jemand interessiert, ich habe diese Technik auch für den Bau meiner Rom Dioramas (1/72) benutzt:
https://www.geschichte-in-miniaturen.de/....php?f=24&t=446
https://www.geschichte-in-miniaturen.de/....php?f=24&t=486
https://www.geschichte-in-miniaturen.de/....php?f=24&t=497
https://www.geschichte-in-miniaturen.de/....php?f=24&t=514
Viel Spaß beim Basteln und Bauen
Reinhold
English Version:
Recently, I have presented my Kittelburg Castle, a mixture of kit sets and scratch building.
Ancient walls, houses, castle ruins and even intact castles can be built from scratch. Here I describe how to make a castle ruin, Castle Frankenstein, from cardboard and modelling clay (Picture Mauern 01). Further down I describe the building of a tower for the Kittelburg Castle (Picture Mauern 16).
It is always good to make a sketch or to assemble the model parts, once you have cut them. Sellotape helps to hold them lightly together (Picture Mauern 02).
Picture ‘Mauern 03’ shows the materials and tools one needs. Solid cardboard (not corrugated cardboard) of various thickness, air-drying modelling compound, such as Jovi or DAS, artist knife (artist spatula or palette knife), brass profiles, roller, spatula, ruler, wire brush, sharp craft knife, glue, acrylic paint.
The walls are cut from cardboard and the windows- ad door openings cut out with the sharp craft knife (Picture Mauern 04). If the cardboard has a glossy paper layer, pull it off. The modelling compound sticks better to the rough cardboard and not so well to the glossy paper.
Form and spread the modelling clay roughly with hand and fist and then roll it equally thick with the roller (Picture Mauern 05). Thickness about 2 – 3mm. The working surface is a thick plastic sheet.
The cardboard is made moist with brush and water and then the modelling compound is laid onto it (Picture Mauern 06). With the roller, the compound is rolled out on the cardboard. Not too tight and but tight enough to see the contours of windows and doors.
Using the artist knife cut off surplus clay (Picture Mauern 07).
Cut out windows and doors. The brass profile can be used to form the windows and doors (Picture Mauern 08).
A cut-off paint brush handle helps to form the round parts (Picture Mauern 09).
The window frames are formed with the artist knife (Picture Mauern 10). A brass profile serves as a stamp to form the stone of the door frame. For the arch I used a brass profile that I had formed slightly with pliers, so that the stones get the right shape for an arch.
Now comes the Sisyphus-work of the wall making (Picture Mauer 11). If you want perfect results, form all stones individually with the brass profile. Here, I have also made my own stamp (brass profile cut into small strips and glued together). With this stamp the imprinting of the stones can be sped up.
If you wish, you can give the stones a rough surface by using a wire brush (Picture Mauer 12). A few stones were cut out using the brass profile. That way, you form gaps as they exist in real walls as well. Let the wall dry for several days as the modelling clay takes its time to set. Here, I have built the walls individually. Often it is better to glue the cardboard walls together before applying the modelling clay. Matter of taste.
Once the wall is dry, apply the base paint (Picture Mauer 13). I use slightly diluted acrylic paint. In this example, I used grey. For the Frankenstein ruin, I used a yellow-brown paint. Let it dry overnight.
A brown wash with diluted acrylic paint is the last step for the wall (Picture Mauer 14). Well, in this case the building still has to be assembled. It may also pay to weather with powder paint afterwards.
Picture ‘Mauer 15’: Close-up of the ancient wall of castle ruin Frankenstein. The Halloween Party can begin.
NOW STARTS THE MORE COMPLICATED PART OF BUILDING ANCIENT WALLS AND TOWERS:
Picture ‘Mauern 16’: Here I describe the making of arches, battlements and cornerstones (quoins). These structures give the castles their special characteristic, as can be seen here at the castle keep of my Kittelburg Castle that was completely built from scratch.
In order to make round towers, you need solid cardboard tubes, for example like here in picture ‘Mauern 17’ a potato chip container (Pringles or other).
Firstly, the glossy paper on the surface is removed. Then the openings for windows and door are cut out with a sharp craft knife (pictures Mauern 18, 19). It is important to stabilise the cardboard tube by gluing in cardboard floors. By doing this, it is possible to apply the necessary pressure to the modelling compound without distorting the cardboard tube. The inside of the tube is then painted black. Window openings and door openings in a castle are generally open and it looks better when it is dark inside, rather than white or beige.
For creating the battlement and arches, you have to calculate first and draw on cardboard. Here we use relatively thin cardboard and cut out the structures (picture Mauern 20).
As we want to make the arches 3-dimensional, I have glued in a strip of thick cardboard and the upper end of the tower (picture Mauern 21).
Here the thin cardboard is glued on and held in position with pins until the glue is dry (picture Mauern 22).
Next the gaps under the arches are filled with modelling compound (picture Mauern 23). You only need enough to fill the gap. It is not necessary to fill the whole inner hollow.
From small pieces of modelling compound we form the lower, weight bearing stones of the arches (the proper name is impost). They are lightly squeezed to the cardboard around the edges (picture Mauern 24).
Window- and doorframes are formed from modelling compound strips. These have to be thicker than the final wall thickness in order to stick out. The keystone and the wedge-shaped stones (voussoir) of the arch are formed with a brass profile that had been shaped like a wedge with pliers picture Mauern 25).
The upper part of the tower, battlement and arches, are formed with modelling compound that is pressed tightly to the cardboard (picture Mauern 26). Don’t forget to moisten the cardboard before applying the clay.
Schritt 11:
The battlements are formed with the artist knife (picture Mauern 27) and then the arches are cut out and formed with a round (cut-off) brush handle (picture Mauern 28).
Using the brass profile, the stones are formed (picture Mauern 29).
Pictures Mauern 30 to 33: Now the main part of the tower wall is formed. Let it dry and the round tower is ready for painting.
Pictures Mauern 34, 35: Here we see how stone edges can be made. You apply a strip of modelling compound (thicker than the main wall) along the house edge and cut out the stones using a brass profile. Leave it to dry before building the main wall.
Pictures Mauern 36 and 37 show the readily painted round tower (grey base colour, brown wash, some stones re-painted, and some weathering with powder paint applied), and the castle keep and main building of my Kittelburg Castle.
For those who are interested, I have used this technique in my 1/72 scale Rome Diorama:
https://www.geschichte-in-miniaturen.de/....php?f=24&t=446
https://www.geschichte-in-miniaturen.de/....php?f=24&t=486
https://www.geschichte-in-miniaturen.de/....php?f=24&t=497
https://www.geschichte-in-miniaturen.de/....php?f=24&t=514
Have fun
Reinhold
 Stummis Modellbahnforum
www.stummiforum.de
RE: Alte Mauern, Türme, Burgen - Ancient Walls, Towers, Castles
![]() #1 von
ReiKit
, 16.10.2020 01:11
#1 von
ReiKit
, 16.10.2020 01:11
- ReiKit
- Regionalbahn (RB)
-
Beiträge: 27 Registriert am: 02.12.2018 Ort: Wellington, Neuseeland Spurweite H0, H0m Stromart AC, Digital

RE: Alte Mauern, Türme, Burgen - Ancient Walls, Towers, Castles
![]() #2 von
Holger_D
, 16.10.2020 17:26
#2 von
Holger_D
, 16.10.2020 17:26
Hey Reinhold,
super Anleitung und tolles Ergebnis, danke für deine Mühe! 
Liebe Grüße
Holger
- Holger_D
- CityNightLine (CNL)
-
Beiträge: 1.535 Registriert am: 30.12.2005

RE: Alte Mauern, Türme, Burgen - Ancient Walls, Towers, Castles
![]() #3 von
lernkern
, 16.10.2020 22:53
#3 von
lernkern
, 16.10.2020 22:53
Tag.
Auch von mir herzlichen Dank für die anschauliche Anleitung. Toll gemacht und das Resultat kann sich auch sehen lassen!
Gruß
Jörg
Unsere DEAG: Überland-Gütertram in H0m
Brennerei Schwarz
- lernkern
- Metropolitan (MET)
-
Beiträge: 3.258 Registriert am: 02.12.2011 Ort: Südostoberbayern und Hovedstaden Spurweite H0, H0m Steuerung DCC++ mit JMRI DecoderPro Stromart AC, DC, Digital

RE: Alte Mauern, Türme, Burgen - Ancient Walls, Towers, Castles
![]() #4 von
Dioramann
, 17.10.2020 11:33
#4 von
Dioramann
, 17.10.2020 11:33
Hallo Reinhold, ich begeistert von der bemerkens- und sehenswerte Vorstellung deiner Vorgehensweise beim Modellbau. So dokumentiert ist das sicherlich eine große Hilfe für den ein oder anderen Modellbauer.
Solche Beiträge sind eine unbedingte Bereicherung für ein Forum wie dieses.
Gruß Norbert


RE: Alte Mauern, Türme, Burgen - Ancient Walls, Towers, Castles
![]() #5 von
epoche6
, 15.09.2021 08:05
#5 von
epoche6
, 15.09.2021 08:05
Hallo Reinhold,
schließe mich Norbert voll und ganz an.
Sehr schöne Bilder. Toller Modellbau!
Gruß Alfons
- epoche6
- InterRegio (IR)
-
Beiträge: 173 Registriert am: 12.11.2017 Spurweite H0, N Stromart Digital
-
- Ähnliche Themen
- Antworten
- Zugriffe
- Letzter Beitrag
-
- Neuling im Anlagenbau u. "aus Alt mach Neu"
Erstellt im Forum Anlagenbau von MissMarple - 53
- 3712
- Letzter Beitrag von
MissMarple

22.04.2024 06:46
- Neuling im Anlagenbau u. "aus Alt mach Neu"
-
- alt 1
Erstellt im Forum Foto - Allgemein von Miraculus - 0
- 270
- Letzter Beitrag von
Miraculus
05.09.2017
- alt 1
-
- Die KITTELBURG - KITTELBURG Castle
Erstellt im Forum Gebäudebau von - 1
- 1199
- Letzter Beitrag von
ReiKit
14.10.2020
- Die KITTELBURG - KITTELBURG Castle
-
- RE: 3 Burgen und 1 schloss Gebaut - Bilder.
Erstellt im Forum Gebäudebau von - 4
- 6212
- Letzter Beitrag von
Lasstmichdurch
23.02.2022
- RE: 3 Burgen und 1 schloss Gebaut - Bilder.
-
- Bau der Burg - Spitze der Anlage
Erstellt im Forum Meine Dioramen von - 5
- 3658
- Letzter Beitrag von
Lukas_
06.09.2019
- Bau der Burg - Spitze der Anlage
-
- Burg Falkenstein,..ein Drama!
Erstellt im Forum Anlagenbau von - 53
- 24971
- Letzter Beitrag von
BahnOtto
17.01.2021
- Burg Falkenstein,..ein Drama!
-
- Gleisplan Berg-Tal-Burg im Keller, H0, Märklin K-Gleis
Erstellt im Forum Anlagenplanung von - 21
- 8149
- Letzter Beitrag von
E-Lok-Muffel
30.10.2016
- Gleisplan Berg-Tal-Burg im Keller, H0, Märklin K-Gleis
-
- Bilder vom alten Bahnhofsgebäude in Burg auf Fehmarn gesucht
Erstellt im Forum Foto - Allgemein von - 3
- 2761
- Letzter Beitrag von
elkmelker
09.02.2012
- Bilder vom alten Bahnhofsgebäude in Burg auf Fehmarn gesucht
-
- die alten Burger (?)
Erstellt im Forum Spur H0 von - 13
- 3578
- Letzter Beitrag von
katzenjogi
28.02.2010
- die alten Burger (?)
